How to Replace Your JD 6100D, 6110D, 6115D, 6125D, 6130D and 6140D Tractors Primary Fuel Filter & Water Separator (DIY Guide)
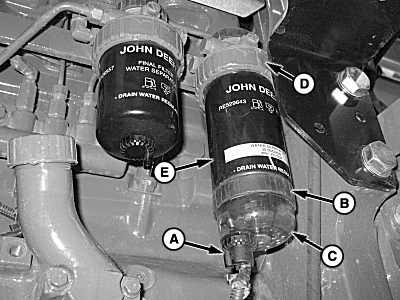
A-Drain Port
B-Bottom Retaining Ring
C-Water Separator Bowl
D-Top Retaining Ring
E-Primary Fuel Filter
🛠️ How to Replace Your Primary Fuel Filter & Water Separator (DIY Guide)
Replacing your primary fuel filter is a standard 500-hour maintenance task. Here is a step-by-step breakdown to get your machine running clean again.
📋 Before You Start: What You Need
- New Primary Fuel Filter (and new seal/gasket)
- New Water Separator Bowl (or a clean, undamaged one if reusing)
- Drain Pan/Container (for old fuel)
- Drain Hose (to fit the drain port)
- Shop Rags/Towels (fuel is slippery and messy)
⚙️ Step-by-Step Replacement Procedure
Step 1: Drain the Old Fuel (Safety First!)
- Action: Attach a drain hose to the Drain Port (A).
- Action: Place a suitable container underneath to catch the fuel.
- Action: Loosen the drain plug and let the fuel flow out completely.
- Note: Do not skip this step, or you will make a huge mess when removing the bowl.
Step 2: Remove the Water Separator Bowl
- Action: Loosen the Bottom Retaining Ring (B).
- Action: Carefully remove the Water Separator Bowl (C).
- Action: Unplug the wiring harness (this is usually connected to a water-in-fuel sensor in the bowl).
Step 3: Remove the Old Filter
- Action: Loosen the Top Retaining Ring (D).
- Action: Pull off the old Primary Fuel Filter (E) along with the old filter seal.
Step 4: Inspect & Prep
- Action: Throw away the old filter.
- Action: Check the Filter Seal: Look closely at the old seal for cracks, breaks, or signs of leaking. If it looks bad, the new one might leak too if the surface is damaged.
- Action: Clean and dry the Water Separator Bowl (C) thoroughly.
Step 5: Install the New Bowl
- Action: Attach the (clean or new) water separator bowl to the mounting bracket.
- Action: Tighten the Bottom Retaining Ring (B) until it snaps into place.
- ⚠️ Warning: DO NOT OVERTIGHTEN. These rings are usually plastic or nylon and can crack easily.
Step 6: Install the New Filter
- Action: Install the new primary fuel filter and the new filter seal onto the machine.
- Action: Tighten the Top Retaining Ring (D) until it snaps into place.
- ⚠️ Warning: DO NOT OVERTIGHTEN. Just until it clicks/snaps.
Step 7: Reconnect the Electronics
- Action: Plug the wiring harness back in securely.
Step 8: Bleed the System
- Action:You are NOT done yet! You must bleed the fuel system to remove air.
- Note: Refer to the specific bleeding procedure in your manual to avoid engine starting issues.
⚠️ Critical Warnings & Reminders
To avoid damaging your expensive equipment, please pay close attention to these points:
- No Over-Tightening: Both retaining rings (Top “D” and Bottom “B”) are designed to snap into place. Cranking them down with excessive force will strip the threads or crack the plastic housing, leading to expensive leaks.
- Seal Inspection: Always inspect the sealing surface. A cracked seal is the most common cause of post-maintenance leaks.
- Bleeding is Mandatory: After draining the fuel and opening the system, air will be trapped inside. If you don’t bleed the system according to the manual, the engine may not start, or it may run poorly.
- Dispose of Fuel Properly: Old diesel fuel and water mixture should be disposed of at a hazardous waste facility, not poured on the ground.